All in One View
Content from What is QMI?
Last updated on 2026-03-31 | Edit this page
Overview
Questions
- What is QMI?
Objectives
- Explain what is QMI and its main features
What is QMI?
QMI, Quantum Measurement Infrastructure, is a Python 3 framework for controlling laboratory equipment. It is suitable for anything ranging from one-off scientific experiments to robust operational setups.
QMI is developed by QuTech to support advanced physics experiments involving quantum bits. However, other than its name and original purpose, there is nothing specifically quantum about QMI — it is potentially useful in any environment where monitoring and control of measurement equipment is needed. It is also multi-platform. At QuTech, QMI is regularly used in both Linux and Windows, and running QMI on macOS is also possible.
It supports encapsulating instruments and devices under computer control. A number of instrument and device drivers are provided out of the box, and it is relatively easy to add your own. QMI makes use of tasks that can encapsulate a (background) process that needs to run temporarily or indefinitely. It offers network transparency; instruments and tasks can be remotely started, stopped, monitored and controlled. With these features it can be used as basis for monitoring and control of complicated setups, distributed over multiple locations.
Main Features
Device drivers
With device drivers instruments and devices can be controlled. Device drivers are importable classes in QMI with (a selection of) functions with which the device can be controlled and monitored. QMI has currently device drivers for 45 manufacturers and 80 devices. In the picture below you can see most of the supported instruments in QMI.

Remote Procedure Calls
The second main feature of QMI is its Remote Procedure Call (RPC) protocol that enables communication between computers in the same network.
QMI signals
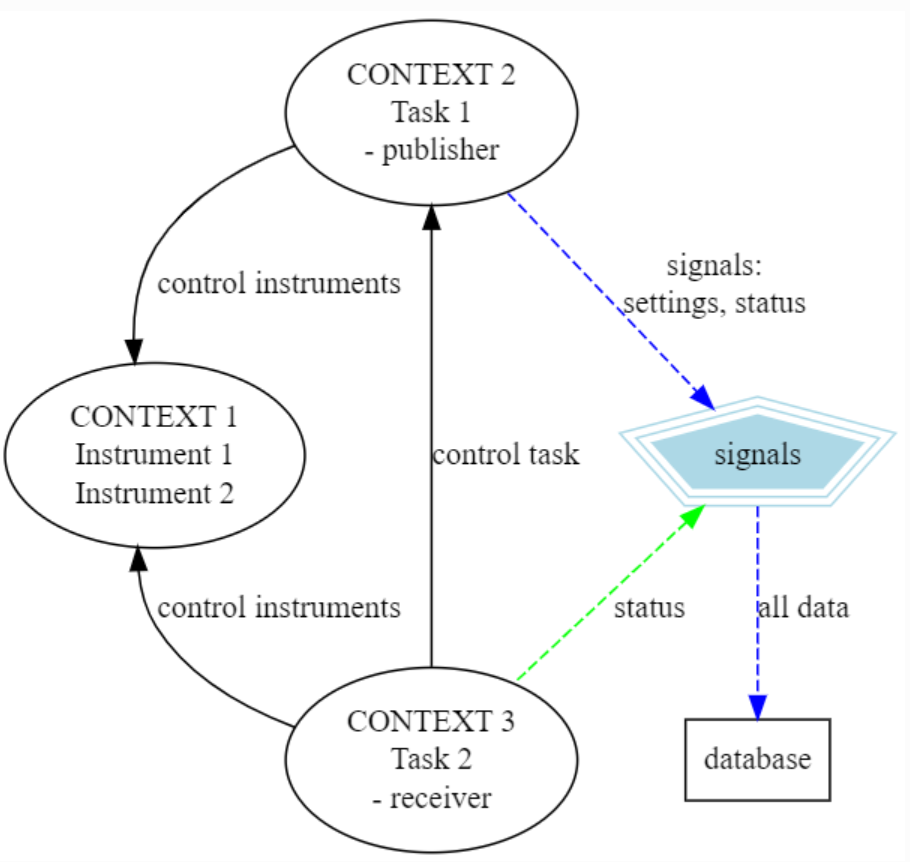
The third main feature to mention is the QMI signals. The device drivers and tasks can be equipped with signal publishers and receivers. These can be used e.g. to send simple triggering signals between tasks or devices, or to send data to some external party. They can become handy with tasks that need to wait for some event to occur before performing some specific action, and thus wait to receive a signal from a publisher. Or if some data needs to be (periodically) saved to a database, like InfluxDB or our own QuTech Data Lake, for later analysis. The signals have been also used for remote live monitoring by sending data to a Grafana server.
QMI contexts
When starting QMI in a Python program, a QMI context is started. While the program is running, this context contains all information about the device drivers and tasks added in the context in the program. Another main feature of QMI is that these contexts are also approachable from another QMI context, and the instruments and tasks in the context can be controlled through another context, see Figure 1. The three contexts in Figure 1 could reside in three different PCs and communicate with each other with the help of the RPC protocol and QMI signals. The user only needs to setup QMI configuration files for these contexts, where information about other contexts are present. That way the contexts know where to look for other contexts. It is possible to also look for contexts not defined in the configuration files, but more about that later.
- Device drivers: With device drivers instruments and devices can be controlled
- QMI contexts: A QMI context envelops instruments, tasks and other RPC objects and can be connected to from outside from another QMI context
- Remote Procedure Calls: Custom RPC are used to control objects in QMI contexts
- QMI signals: QMI context objects can also broadcast and receive signals, which can include e.g. data
Content from 'Hello World'
Last updated on 2026-05-11 | Edit this page
Overview
Questions
- How are the QMI contexts created?
Objectives
- Create a simple QMI context
“Hello world” context creation
Start up python
pythonWe are now in an interactive Python shell. Let’s start with importing QMI.
Presuming you had just installed QMI with Pip, this should just work without any issues. Let’s continue to creating a simple context called “hello_world”.
Now, your first QMI context has been started. You can verify this with
OUTPUT
address         type
--------------  -----------------
hello_world.$context  _ContextRpcObject
--------------  -----------------
A couple of remarks are in place already here. The context name is
with underscore (_) as spaces in the context names cause issues. So,
avoid those and also special letters like ‘!’, ‘@’, ‘#’, ‘$’ etc. We
also gave a second input parameter config_file=None for the
call. This was actually optional as the default value for the parameter
is None, but we wanted to illustrate with this that we
start a context without specifying a QMI configuration file. In that
case, QMI will create a simple configuration for the context. Now just
let’s stop the “hello_world” context.
We can confirm that the context has been stopped
OUTPUT
'*** No active QMI context ***'And trying to a command like qmi.context() now will give
an exception. Note that it is important always to stop your contexts.
Python does not always manage to clean up the QMI contexts properly,
especially when the context has plenty of things going on, if the
context is not manually stopped before. This can leave bogus QMI
contexts running on your system with e.g. some kind of task or
instrument control active.
- A QMI context is created using
qmi.start("<context_name>")call - Always remember to stop the context with
qmi.stop()
Content from Controlling an instrument
Last updated on 2026-03-31 | Edit this page
Overview
Questions
- How do I control an instrument?
Objectives
- Add an instrument into a QMI context and control it with RPC commands
Using QMI to control one instrument
In this example we show how to create an instrument object in a context. For this, we have a dummy instrument in the QMI instruments to illustrate. See also the QMI readthedocs documentation about the dummy instrument class call interface. Let’s import the device driver.
So we imported the QMI device driver class called
NoisySineGenerator from QMI instrument “manufacturer”
dummy and device noisy_sine_generator module.
To use this, we start a new QMI context and “make” an instrument object
from the device driver.
Now we have an instrument object nsg present in Python.
The instrument is also added into the context. This can be checked
with:
OUTPUT
address       type
------------  ------------------
nsg_demo.nsg  NoisySineGenerator
------------  ------------------
The address “nsg_demo.nsg” means that now there is an instrument object “nsg” present in context “nsg_demo”. The type confirms the instrument object is of expected class type. Alternative way to confirm this is simply to type the object in Python.
OUTPUT
<rpc proxy for nsg_demo.nsg (qmi.instruments.dummy.noisy_sine_generator.NoisySineGenerator)>As can be seen, the created object is actually an RPC proxy of the actual instrument object. This has a couple of consequences: The first is that the proxy object can be now shared through the context with other contexts, allowing remote control of the instrument. The second is that the proxy object does not have the full class interface of the device driver, but only the variables that are present in QMI proxy class and functions that have been selected to be RPC callable. We can list the variables of the object with
It prints out the class docstring, a listing of its callable RPC methods, signals and class constants.
Here are useful information, like the docstring which is the
documentation string of the class object. Then all entries listed as
“RPC methods” are the callable RPC functions of the object, with their
expected input parameters and return value type. A few methods related
to the proxy locking (lock, unlock,
is_locked and force unlock are not present,
though. We also won’t handle these methods in the course, but you can
have a look at the tutorial.
You see also empty listings “signals” and “constants”, but for this
instrument class there are none present.
Before using any QMI instrument, it needs to be opened (and closed afterwards).
Now, in the printed out listing, a lot of useful methods are present and supported through the proxy. We can try one:
OUTPUT
96.18801232566346So we get returned one sample of the sine wave at a random moment. Let’s do for demonstration purpose a little for loop print out the sine wave of our generator “instrument”:
PYTHON
import time
for i in range(1000):
    print(" " * int(40.0 + 0.25 * nsg.get_sample()) + "*")
    time.sleep(0.01)
Nice huh? Let’s then close the instrument with
nsg.close(), stop this context with qmi.stop()
and exit Python with exit() and prepare for next
example.
- Instruments can be added into contexts with
<instrument_object> = qmi.make_instrument("<name>", <ClassName>, <possible_extra_parameters>) - Instrument class description can be seen with
help(<instrument_object>) - Detailed information about the object and variables can be obtained
with
help(<instrument_object>) - The returned instrument object is an RPC proxy object of the actual class object
-
<instrument>.open()needs to be called first before other RPC methods can be used. Don’t forget to call<instrument>.close()afterwards to ensure stable exit behaviour.
Content from Configuring and logging
Last updated on 2026-03-31 | Edit this page
Overview
Questions
- What are QMI configuration and log files?
Objectives
- Know how to create a basic configuration file.
QMI Configuration and log file
Many aspects of QMI are configurable via a configuration
file. The syntax of this file is very similar to JSON, but unlike JSON, the
configuration file may contain comments starting with a # character. By
default, QMI attempts to read the configuration from a file named
qmi.conf in the home directory (i.e.
‘/home/<user_profile>’ in Linux or ‘C:\Users\<user_name>’
folder on Windows). If you want to use a different file name or
location, you can specify the configuration file path with the
config_file= argument of qmi.start() or in the
environment variable QMI_CONFIG. Let’s create a
configuration file qmi.conf at the course directory with
the following contents:
JSON
{
    # Log level for messages to the console.
    "logging": {
        "console_loglevel": "INFO"
        # "logfile": "log.log"
    }
    # Directory to write main log file.
    # "log_dir": "~/qmi_course/log"
}
This configuration file changes the log level for messages that appear on your terminal. By default, QMI prints only warnings and error messages. Our new configuration also enables printing of informational messages. For further details about logging options, see documentation on qmi.core.logging_init module. Test the new configuration file in a new Python session:
If the configuration file is found and written correctly, QMI should
print a bunch of log messages on the terminal after the call to start.
If you don’t see any output, you might have to give full path location
for the config_file= argument to, or try setting the
QMI_CONFIG environment variable with:
export QMI_CONFIG=`pwd`/qmi.confOr in powershell
At your home directory should also now be a file called
qmi.log. The file works as a log for QMI programs. You will
find in this file a log of actions you took until now while testing your
first examples. The logging can be disabled by giving input parameter
init_logging=False for qmi.start(). We will
add more settings to the configuration file as we progress through this
tutorial.
Let’s try the different options to change the QMI log file name and
logging location. Try, for example, uncommenting the “logfile” and
“log_dir” options in your qmi.conf file. Then run again the
test in Python and see if the location and file name of the log file did
change. Note that JSON is very picky about the use of commas. There must
be a comma between multiple elements in the same group, but there may
not be a comma after the last element of a group.
You can also try commenting out these lines again and to use the
QMI_HOME environment variable by setting it with:
export QMI_HOME=`pwd`-
qmi.confhas a JSON-like structure, but allows comments starting with ‘#’ -
qmi.conflocation can be given as an argument toqmi.startby settingQMI_CONFIGenvironment variable - Log levels are set within “logging” keyword section
- Default name and location of the log file are
qmi.logand the user’s home directory - These can be changed using “logfile” and “log_dir” options in
qmi.conf, but also by settingQMI_HOMEenvironment variable.
Content from Accessing an instrument remotely
Last updated on 2026-05-11 | Edit this page
Overview
Questions
- How can we access the instruments remotely?
Objectives
- Learn to connect between QMI contexts and control instruments over contexts
Create an instrument ‘server’
QMI makes it easy to access a QMI instrument driver instance that exists in another QMI context in another Python program. The power of QMI is that these programs may be even running on different computers. The Python program that contains the instrument instance must, though, be accessible via the network. This can be achieved by extending the QMI configuration file. The new file will look as follows:
JSON
{
    # Log level for messages to the console.
    "logging": {
        "console_loglevel": "INFO"
        # "logfile": "log.log"
    },
    # Directory to write main log file.
    "log_dir": "~/qmi_course/log",
    "contexts": {
        # Testing remote instrument access.
        "instr_server": {
            "host": "127.0.0.1",
            "tcp_server_port": 40001
        }
    }
}
Start the instrument ‘server’ with the following lines:
PYTHON
from qmi.instruments.dummy.noisy_sine_generator import NoisySineGenerator
qmi.start("instr_server")
nsg = qmi.make_instrument("nsg", NoisySineGenerator)
Because the name of the context, “instr_server”, matches the name
specified in the configuration file, QMI opens a TCP server port for
this context. Check that the reading of configuration file succeeded by
calling qmi.context().get_context_config(). In the response
string, the host and tcp_server_port values
should be the same as in the configuration file. If this is not the
case, stop the context, and start it again providing the
qmi.conf file path with the config_file
parameter. Then try again to confirm the host and port. Other QMI
contexts from other Python programs can now connect to this port to
access the sine generator instrument.
Accessing the instrument as a ‘client’
To try this, leave the instrument server session running and start
another Python session in a separate terminal window (but using the same
qmi.conf file) to create a ‘client’:
PYTHON
import qmi
qmi.start("random_client")
qmi.context().connect_to_peer("instr_server")
nsg = qmi.get_instrument("instr_server.nsg")
nsg.get_sample()
NOTE: With Windows, the
connect_to_peermight require explicit input of the context address. You can check the address by callingqmi.show_network_contexts(). Then give the whole address as second parameter in the call withpeer_address=<the_address>. If the connecting now went without an exception, everything should be now OK. You can confirm this by calling againqmi.show_network_contexts()and see that the ‘connected’ column has now changed to ‘yes’. Then proceed to get the instrument and a sample.
NOTE 2:
peer_address=”127.0.0.1:40001”also works as the ‘localhost’ address changes into the IPv4 address in the background. This exercise demonstrated how the second Python program is able to access theNoisySineGeneratorinstance proxy that exists within the first Python program (and QMI context within it). To do this, the QMI context of the second program connects to the “instr_server” context via TCP. Behind the scenes, the two contexts exchange messages through this connection to arrange for the methodget_sample()to be called in the real instrument instance through the proxy, and the answer to be sent back to the calling proxy in the second program.
- Instruments to be accessed remotely should be defined in
qmi.conf- both on the ‘server’ and ‘client’ side - Connect to another QMI context using
qmi.context().connect_to_peer("<context_name>", peer_address="<ho.st.i.p:port>") - Obtain remote instrument control with
qmi.get_instrument("<context_name>.<instrument_name>")
Content from Create a task and a 'service'
Last updated on 2026-05-12 | Edit this page
Overview
Questions
- What are tasks and what can they do?
- Can I run a task as a (background) ‘service’ process?
Objectives
- Learn how to create tasks with (customized) task runners
- Learn how to make a background ‘service’ process with
qmi_proc
Example: QMI service process to control amplitude of sine wave
Next, we want to demonstrate QMI tasks and how they can be used in setting up services, i.e. tasks running as background processes, on your PC. As an example we will create a task which will constrain the sine wave amplitude to be around 10 (of arbitrary units) and run this task as a background process - a “service” in QMI slang.
Demo task
To demonstrate a custom task, we need to create one. Make a new
Python module inside the module path for your project. If you don’t have
a module path yet, just create a file demo_task.py in the
current directory:
PYTHON
from dataclasses import dataclass
import logging
import qmi
from qmi.core.rpc import rpc_method
from qmi.core.task import QMI_Task, QMI_TaskRunner


# Global variable holding the logger for this module.
_logger = logging.getLogger(__name__)


@dataclass
class DemoLoopTaskSettings:
    sample: float | None
    amplitude: float


class CustomRpcControlTaskRunner(QMI_TaskRunner):
    @rpc_method
    def set_amplitude(self, amplitude: float):
        settings = self.get_settings()
        settings.amplitude = amplitude
        self.set_settings(settings)


class DemoRpcControlTask(QMI_Task):
    def __init__(self, task_runner, name):
        super().__init__(task_runner, name)
        self.settings = DemoLoopTaskSettings(amplitude=100.0, sample=None)

    def run(self):
        _logger.info("starting the background task")
        nsg = qmi.get_instrument("proc_demo.nsg")
        while not self.stop_requested():
            self.update_settings()
            nsg.set_amplitude(self.settings.amplitude)
            self.sleep(0.01)

        _logger.info("stopping the background task")
Note that we define class DemoRpcControlTask with one
special method named run(). This method contains the code
that makes up the background task. In this simple example, the task
simply loops about 100 times per second, reading settings from the sine
generator and adjusting its amplitude. The task uses the function qmi.core.task.QMI_Task.sleep()
to sleep instead of time.sleep(). The advantage of this is
that it stops waiting immediately when it is necessary to stop the
task.
Task runner script
Now we create the program starting up and running the task. Make
task_demo.py file with the following contents:
PYTHON
import logging
import time
import qmi
from qmi.utils.context_managers import start_stop
from qmi.instruments.dummy.noisy_sine_generator import NoisySineGenerator
from demo_task import DemoRpcControlTask, CustomRpcControlTaskRunner

# Global variable holding the logger for this module.
_logger = logging.getLogger(__name__)


def main():
    with start_stop(qmi, "proc_demo", config_file="./qmi.conf"):
        ctx = qmi.context()
        with qmi.make_instrument("nsg", NoisySineGenerator) as nsg:
            task = qmi.make_task("demo_task", DemoRpcControlTask, task_runner=CustomRpcControlTaskRunner)
            task.start()
            _logger.info("the task has been started")
            try:
                while task.is_running() and not ctx.shutdown_requested():
                    sample = nsg.get_sample()
                    amplitude = nsg.get_amplitude()
                    print(" " * int(40.0 + 0.25 * sample) + "*")
                    if abs(sample) > 10:
                        task.set_amplitude(amplitude * 0.99)
                    else:
                        task.set_amplitude(amplitude * 1.01)

                    time.sleep(0.01)

                task.stop()

            except:
                task.stop()
            finally:
                _logger.info("the task has been stopped")
                task.join()


if __name__ == "__main__":
    main()
This program now takes care of creating the instrument
nsg and followingly starting up the task, using the
with context managers. The script loops about hundred times
per second, and at each iteration prints out the latest sine wave point
(*), and controls the DemoRpcControlTask’s amplitude. In
practice, we are now suppressing the sine wave by continuously checking
its sample value and setting the amplitude so that the sample value
would stay as close to 10 as possible.
Configuration file
The task needs now somewhat more complex configuration of the
qmi.conf, but nothing scary, I promise. The new
configuration will now have a new entry for the background process
proc_demo:
{
    # Log level for messages to the console.
    "logging": {
        "console_loglevel": "INFO"
        # "logfile": "log.log"
    },
    # Directory to write main log file.
    "log_dir": "~/qmi_course/log",
    "contexts": {
        # Testing remote instrument access.
        "instr_server": {
            "host": "127.0.0.1",
            "tcp_server_port": 40001
        },
        # Testing process management.
        "proc_demo": {
            "host": "127.0.0.1",
            "tcp_server_port": 40002,
            "enabled": true,
            "program_module": "task_demo"
        }
    },
    "process_management": {
        "output_dir": "~/qmi_course/log"
    }
}
The ‘”enabled”: true’ parameter makes it possible to start the context via QMI process management, and ‘”program_module”: “task_demo”’ line tells the QMI to start a module named ‘task_demo.py’ for this process. We’ll start it in a qubit.
Running the task as a service with qmi_proc
We can now start the service using qmi_proc program.
qmi_proc is a command-line executable created when
installing QMI, see also documentation about managing
background processes. It can be used to start, stop and inquire
status of services. To start the “proc_demo” service, type the following
(the “–config ./qmi.conf” is not necessary if the qmi.conf
is in the default path).
qmi_proc start proc_demo --config ./qmi.confLeave the program now to run a few seconds and then stop it:
qmi_proc stop proc_demo --config ./qmi.confThe use of the qmi_proc creates extra output files for
services. One was now created also for “proc_demo” service. You can find
it in the default location with name “proc_demo_
Challenge
You might want to try to manually disturb the service to confirm that
the suppression of the sine wave really works. For that, re-start the
service again. Now, in another terminal, start up QMI (using the same
qmi.conf file) and connect to the task’s QMI context and
use QMI’s get_task command to get a proxy for the task.
From this proxy, use the custom RPC method set_amplitude to
crank up the amplitude. Then see the task’s log file what happened.
BONUS QUESTION:: You have to use floating point values for the
set_amplitude command. An integer value (like 1000) will
crash the task. Why is that?
There are plenty of other things going on on this example, like the
use of a custom QMI_TaskRunner with an RPC method added
into the runner. We also make use of file-specific loggers for logging.
For more information about QMI tasks see the tutorial,
and about logging the Design
Overview in documentation. There are also other examples of tasks in
the examples
folder of the QMI repository.
Further, the amplitude control through the task settings actually utilizes the QMI’s signalling feature. For more details on this, you can read into signalling and look at API of qmi.core.task in the documentation.
- Also QMI tasks need to be defined in
qmi.conf. To enable running the task a a service, parameters “enabled” and “program_module” need to be defined. - A task consists of a
QMI_Taskclass and aQMI_TaskRunnerclass. The latter can be customized to include RPC methods in tasks. - Task is started with
start(), stopped withstop()and after stopping, the task thread should be “joined” withjoin()for properly exiting the thread. -
qmi_procis an executable created while installing QMI. It can be used to start, stop and checking status of (local) QMI tasks running as background processes.
Content from Open-source vs internal code
Last updated on 2026-05-12 | Edit this page
Overview
Questions
- What is the difference between different QMI codebases?
- How is the development done for QMI software?
- Can I make requests and|or contribute?
Objectives
- Know what is the difference between the open-source and internal QMI
- Know how to make requests and how to contribute to the development
QMI open-source vs internal code
QMI has its main development as an open-source software (OSS). But it has also a close-source version (CSS) for development mainly due to licensing reasons as QMI uses also some manufacturer software and libraries. Also for some projects it might be preferable to keep certain aspects out of plain sight during their course. The software can be found in - OSS: https://github.com/QuTech-Delft/QMI (public) - CSS: https://gitlab.tudelft.nl/qmi/qmi (private, you need to be invited to access) repositories.
Code base and development
By browsing the repositories from the links above (if you have access for both), you can get familiar with the code base of both projects. You will see things on the site like “Issues” or “Pull requests” (Github) | “Merge requests” (Gitlab) and “Issue Board” (Gitlab) among others. The development is done normally by tackling the “Issues”. We can call them as “Issue tickets” or just “tickets” as well.
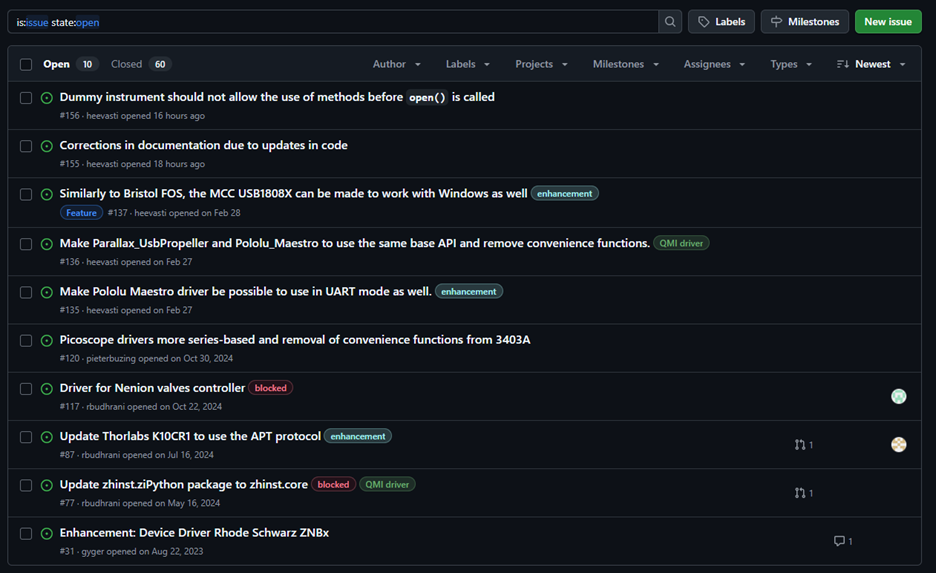
The use of such issue list is that we want to have more traceable and logical system for the development. If a developer or user notices a bug or another issue with the code, or would like to have new features or functionalities, it is best to describe it (as well as possible) in an issue ticket, instead of immediately starting to bash through some changes in the code and try to push that through in the code base. In any case where there is more than one person involved in the code base (and usually even for the lone wolf developer) this is a good idea to prevent too eager contributors messing up the code.
Creating a new issue ticket
To avoid the “writer’s block” when creating a new ticket, templates are available for different ticket types. The templates have a structure ready and a description what should be written in different parts of the ticket. The templates do not need to be written 100% full if some parts are not applicable, though. Use your judgement also. In general applies: The more detailed request with clear description of the desired outcome, perhaps even with a little bit of (meta)code, the easier the ticket is to evaluate and execute, and eventual pull|merge request reviewed. Another common pitfall to avoid is to make too large tickets. If the new feature request starts to get really complex, perhaps it is better to think how it can be split into two or more smaller tickets, with clear reachable goals for each ticket, which together then fulfill the request. This might also be done during the evaluation of the issue, see below the description of ticket progress in QMI.
Tracking issue progress on a board
A ticket progress can be followed on a issue board. A board consists of at least “new” or “open” column and “done” or “closed” columns. In between there can be several other columns to keep track of the ticket progress, like “refinement”, “in progress”, “for review” and others. Below is an example of QMI OSS (private) issue development board.
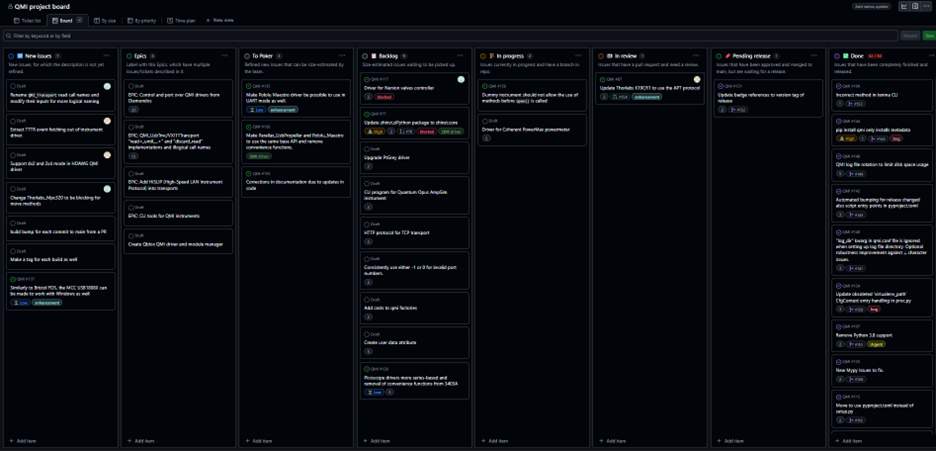
The general progress order is from left to right, where first new issues are made in the first column. If the ticket is written clear and concise enough, it can be moved to be evaluated by the team in “To poker” column. Here, the ticket is “pokered” to have an effort score and can then be then moved to “Backlog” column to wait someone to start working on the issue. Or directly to “In progress” if the issue is going to be worked on straight away. In the code base a new branch is opened (usually from main branch for the repository) to work on the ticket. When the ticket is ready, a pull|merge request is made for the request and the ticket is moved into the “In review” column. Another developer must review the ticket and accept it before the new code in the new branch can be merged. After the code is merged back to its origin, the issue can be moved into the “Pending release” column. When ‘enough’ (term is relative here) issues are in this column, a new release of the code can be made and finally the ticket is moved into “Done”.
We can also move tickets back to left, e.g. if the issue description is not proper for “pokering”, we can send it back to “New issues” to indicate better description is needed. Sometimes, the issue is so large that tackling it in one ticket becomes way too cumbersome. Then splitting it into several smaller new issues is necessary. Quite often also tickets “In review” do not get accepted with extra work needed on the ticket, often the ticket being moved back to “In progress”.
A specialty if the board in Figure 3 is the “Epics” column. This column has issue tickets that are actually descriptions of a large feature request or larger changes in the code base. The Epic ticket describes what is the total goal and how to reach it taking smaller steps, i.o.w. by executing several smaller issue tickets. The aforementioned splitting of a large ticket during evaluation could also result into creation of such Epic issue so that the overall progress, which could span even over multiple releases, can be tracked better.
Now you will be showcased how to make a ticket on a board and how to select a template for it.
Contributing
The users can also pick up their own tickets and develop code in their own branches, and offer them for merging, too! Such contributions are more than welcome as there’s not too many dedicated SW engineers for development. For QMI, we do aim to keep a certain coding style and have some quality requirements for any contribution. QMI coding standard is explained here and a simple guide on how to proceed is here. Note that just delivering code for the bug fix or requested feature is not enough: the code must include also unit-tests and pass the CI-pipelines, fulfilling our acceptance criteria. Only then the pull|merge request can be approved and merged. Other valuable points for good coding practices were mentioned in the IMSEP course.
- In Github we have open-source QMI and in Gitlab the internal closed-source QMI
- Users can make requests via opening new issues a.k.a. tickets in the repository
- You can and are welcome to contribute too! Just follow the guidelines
Content from Releasing and versioning of QMI code
Last updated on 2026-03-31 | Edit this page
Overview
Questions
- How is QMI code released?
- What are the differences between different types of ways to obtain QMI?
Objectives
- Understanding of ways and differences QMI code is released and can be obtained
Releasing, released packaged and stable branches/tags
Finally, a little bit about the releasing of QMI code. Every now and then, after some amount of issues have been approved and merged into main, a new stable branch, tag, release and a package are made. Why so many and what’s the difference? Well, let us explain.
A stable branch is created for each release new version-revision, like 0.49.0 (branch name stable-0-49). If for some reason, later on some user, who needs to using this release version, needs to fix a bug but not to upgrade version, the fix can be done based on the stable branch. Now, instead of branching off from the main branch, we branch off from the stable branch, and also merge back to it. A new tag, release, and package of the fix can be made with upgrading the version’s patch number by one. In this case, the new versioning is 0.49.1. If the fix is relevant also for the main branch, it can be “cherry-picked” also there, but it might not be the case.
A tag is usually created together with a stable branch and
possible patches to it. Our naming convention for tags is
v
A release releases the source code as a Zip and a Gzipped Tar files. These can be downloaded and used to install the package for example with Pip locally. These are especially handy if no installable package is available.
A package is an installable wheel
or equal type of file, which can be used to install the software.
QMI creates a new package every time a new tag is
made, builds a wheel for it and uploads it to QMI’s Pypi page. From there QMI
can be installed with simply using the pip install qmi
command, or, if we want to install e.g. specifically version 0.49.1,
pip install qmi==0.49.1.
- While main version-revision development happens through the main branch, also version-revision-specific development can be done through stable branches
- User can also use tags as references to code at certain point of time
- The usual way to install QMI is using Pip and a Pypi package of QMI. But, also releases can be downloaded and used for the installation.