Advanced Git Commands
Last updated on 2025-11-11 | Edit this page
Overview
Questions
- How can I use version control to collaborate with other people?
- What do I do when my changes conflict with someone else’s?
Objectives
- Clone a remote repository.
- Describe the basic collaborative workflow: pushing changes to a common repository.
- Explain what conflicts are, when they can occur, and how we can sole them.
- Look at Git branches, and show how they can be managed/merged through GitLab merge requests.
Collaborating
For the next step, get into pairs. One person will be the “Owner” and the other will be the “Collaborator”. The goal is that the Collaborator add changes into the Owner’s repository. We will switch roles at the end, so both persons will play Owner and Collaborator.
Practicing By Yourself
If you’re working through this lesson on your own, you can carry on by opening a second terminal window. This window will represent your partner, working on another computer. You won’t need to give anyone access on GitLab, because both ‘partners’ are you.
Adding collaborators to your GitLab repo
In case you have not done this already, revisit what you have just learned in the last hour and add your Collaborator to your GitLab recipes project, giving them a “Maintainer” role, which should give them enough rights to complete all the collaborative workflows we will practice today.
Cloning a remote GitLab repo
Next, the Collaborator needs to download a copy of the Owner’s repository to her machine. This is called “cloning a repo”.
The Collaborator doesn’t want to overwrite her own version of
recipes.git, so needs to clone the Owner’s repository to a
different location than her own repository with the same name.
To clone the Owner’s repo into her projects folder, the
Collaborator enters:
OUTPUT
Cloning into 'recipes'...
remote: Enumerating objects: 18, done.
remote: Counting objects: 100% (18/18), done.
remote: Compressing objects: 100% (15/15), done.
remote: Total 18 (delta 4), reused 0 (delta 0), pack-reused 0 (from 0)
Receiving objects: 100% (18/18), 4.17 KiB | 2.09 MiB/s, done.
Resolving deltas: 100% (4/4), done.
Replace ‘alflin’ with the Owner’s username.
If you choose to clone without the clone path
(~/projects/alflin-recipes) specified at the end, you will
clone inside your own recipes folder! Make sure to navigate to the
projects folder first.

Making changes
The Collaborator can now make a change in her clone of the Owner’s repository, exactly the same way as we’ve been doing before:
OUTPUT
# Hummus
## Ingredients
* chickpeas
* lemon
* olive oil
* saltOUTPUT
 1 file changed, 6 insertion(+)
 create mode 100644 hummus.md
Then push the change to the Owner’s repository on GitLab:
OUTPUT
Enumerating objects: 4, done.
Counting objects: 4, done.
Delta compression using up to 4 threads.
Compressing objects: 100% (2/2), done.
Writing objects: 100% (3/3), 306 bytes, done.
Total 3 (delta 0), reused 0 (delta 0)
To gitlab.tudelft.nl:alflin/recipes.git
   9272da5..29aba7c  main -> main
Note that we didn’t have to create a remote called
origin: Git uses this name by default when we clone a
repository. (This is why origin was a sensible choice
earlier when we were setting up remotes by hand.)
Take a look at the Owner’s repository on GitLab again, and you should be able to see the new commit made by the Collaborator. You may need to refresh your browser to see the new commit.
Sync-ing changes made by collaborators
To download the Collaborator’s changes from GitLab, the Owner now enters:
OUTPUT
remote: Enumerating objects: 4, done.
remote: Counting objects: 100% (4/4), done.
remote: Compressing objects: 100% (2/2), done.
remote: Total 3 (delta 0), reused 3 (delta 0), pack-reused 0
Unpacking objects: 100% (3/3), done.
From gitlab.tudelft.nl:alflin/recipes
 * branch            main     -> FETCH_HEAD
   9272da5..29aba7c  main     -> origin/main
Updating 9272da5..29aba7c
Fast-forward
 hummus.md | 5 +
 1 file changed, 5 insertion(+)
 create mode 100644 hummus.md
Now the three repositories (Owner’s local, Collaborator’s local, and Owner’s on GitLab) are back in sync.
A Basic Collaborative Workflow
In practice, it is good to be sure that you have an updated version
of the repository you are collaborating on, so you should
git pull before making our changes. The basic collaborative
workflow would be:
- update your local repo with
git pull origin main, - make your changes and stage them with
git add, - commit your changes with
git commit -m, and - upload the changes to GitLab with
git push origin main
It is better to make many commits with smaller changes rather than of one commit with massive changes: small commits are easier to read and review.
Switch Roles and Repeat
Switch roles and repeat the whole process.
Review Changes
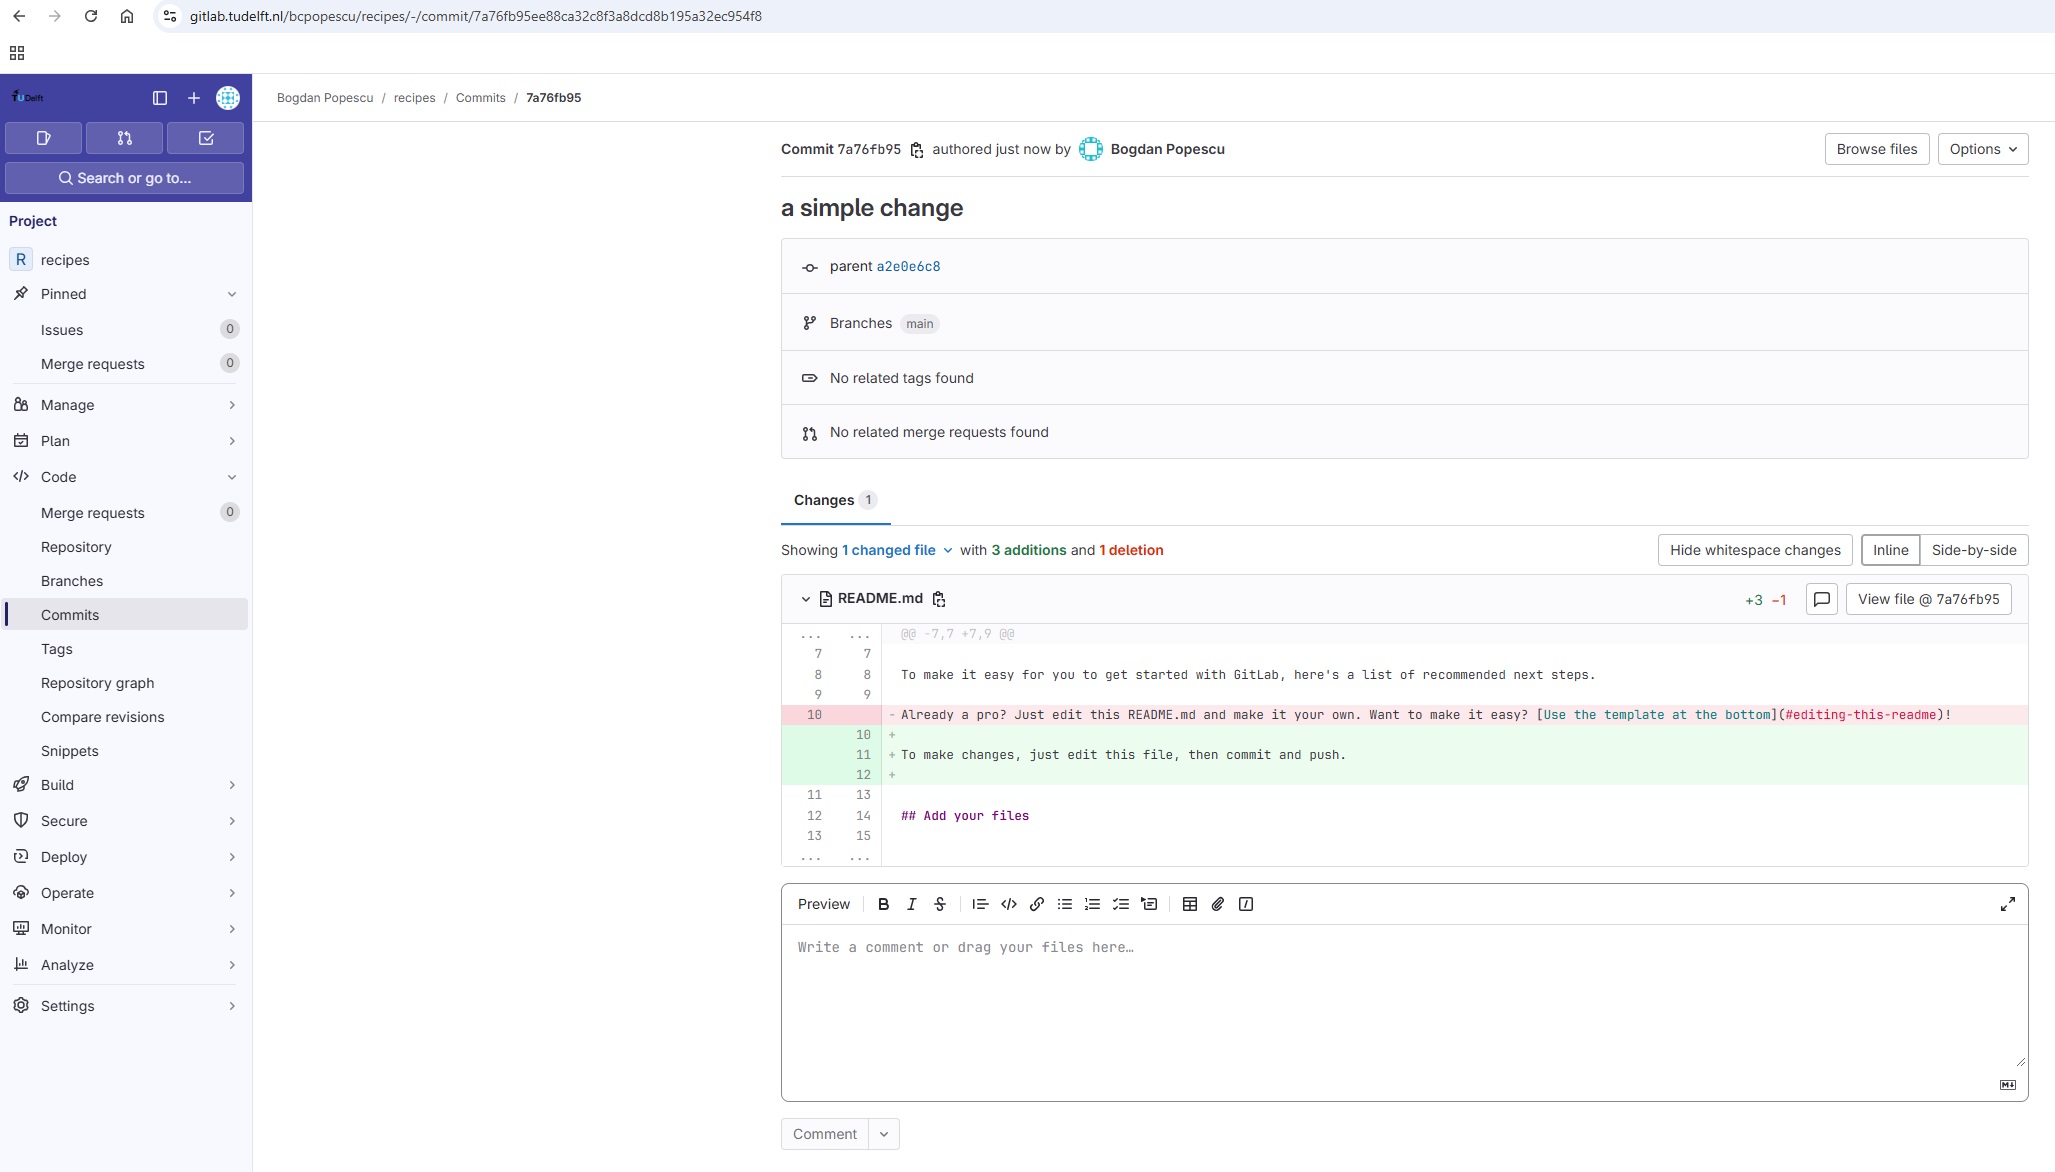
The Owner pushed commits to the repository without giving any information to the Collaborator. How can the Collaborator find out what has changed using GitLab?
On GitLab, the Collaborator can go to the project and click on the “Code” menu on the left panel, and from there select the “Commits” option. This will open a new page on the right panel, showing the commits history for that project. By clicking on such a commit, the user can see the changes made per file, which will be highlighted by GitLab as shown below.
Solving Conflicts
As soon as people can work in parallel, they’ll likely step on each other’s toes. This will even happen with a single person: if we are working on a piece of software on both our laptop and a server in the lab, we could make different changes to each copy. Version control helps us manage these conflicts by giving us tools to resolve overlapping changes.
To see how we can resolve conflicts, we must first create one. The
file guacamole.md currently looks like this in both
partners’ copies of our recipes repository:
OUTPUT
# Guacamole
## Ingredients
* avocado
* lime
* salt
## Instructions
Let’s add a line to the collaborator’s copy only:
OUTPUT
# Guacamole
## Ingredients
* avocado
* lime
* salt
## Instructions
* put one avocado into a bowl.
and then push the change to GitLab:
OUTPUT
[main 5ae9631] First step on the instructions
1 file changed, 1 insertion(+)OUTPUT
Enumerating objects: 5, done.
Counting objects: 100% (5/5), done.
Delta compression using up to 8 threads
Compressing objects: 100% (3/3), done.
Writing objects: 100% (3/3), 331 bytes | 331.00 KiB/s, done.
Total 3 (delta 2), reused 0 (delta 0)
remote: Resolving deltas: 100% (2/2), completed with 2 local objects.
To gitlab.tudelft.nl:alflin/recipes.git
   29aba7c..dabb4c8  main -> main
Now let’s have the owner make a different change to their copy without updating from GitLab:
OUTPUT
# Guacamole
## Ingredients
* avocado
* lime
* salt
## Instructions
* peel the avocados
We can commit the change locally:
OUTPUT
[main 07ebc69] Add first step
 1 file changed, 1 insertion(+)
but Git won’t let us push it to GitLab:
OUTPUT
To https://gitlab.tudelft.nl/alflin/recipes.git
 ! [rejected]        main -> main (fetch first)
error: failed to push some refs to 'https://gitlab.tudelft.nl:alflin/recipes.git'
hint: Updates were rejected because the remote contains work that you do
hint: not have locally. This is usually caused by another repository pushing
hint: to the same ref. You may want to first integrate the remote changes
hint: (e.g., 'git pull ...') before pushing again.
hint: See the 'Note about fast-forwards' in 'git push --help' for details.
Telling Git how to solve conflicts
If you see the below in your output, Git is asking what it should do.
OUTPUT
hint: You have divergent branches and need to specify how to reconcile them.
hint: You can do so by running one of the following commands sometime before
hint: your next pull:
hint:
hint:   git config pull.rebase false  # merge (the default strategy)
hint:   git config pull.rebase true   # rebase
hint:   git config pull.ff only       # fast-forward only
hint:
hint: You can replace "git config" with "git config --global" to set a default
hint: preference for all repositories. You can also pass --rebase, --no-rebase,
hint: or --ff-only on the command line to override the configured default per
hint: invocation.
In newer versions of Git it gives you the option of specifying different behaviours when a pull would merge divergent branches. In our case we want ‘the default strategy’. To use this strategy run the following command to select it as the default thing git should do.
Then attempt the pull again.
OUTPUT
Auto-merging guacamole.md
CONFLICT (content): Merge conflict in guacamole.md
Automatic merge failed; fix conflicts and then commit the result.
The git pull command updates the local repository to
include those changes already included in the remote repository. After
the changes from remote branch have been fetched, Git detects that
changes made to the local copy overlap with those made to the remote
repository, and therefore refuses to merge the two versions to stop us
from trampling on our previous work. The conflict is marked in in the
affected file:
OUTPUT
# Guacamole
## Ingredients
* avocado
* lime
* salt
## Instructions
<<<<<<< HEAD
* peel the avocados
=======
* put one avocado into a bowl.
>>>>>>> dabb4c8c450e8475aee9b14b4383acc99f42af1d
Our change is preceded by
<<<<<<< HEAD. Git has then inserted
======= as a separator between the conflicting changes and
marked the end of the content downloaded from GitLab with
>>>>>>>. (The string of letters and
digits after that marker identifies the commit we’ve just
downloaded.)
Practice using graphical Git tools
Try to solve the conflicts in the guacamole.md file using the Git visual tools in PyCharm

It is now up to us to edit this file to remove these markers and reconcile the changes. We can do anything we want: keep the change made in the local repository, keep the change made in the remote repository, write something new to replace both, or get rid of the change entirely. Let’s replace both so that the file looks like this:
OUTPUT
# Guacamole
## Ingredients
* avocado
* lime
* salt
## Instructions
* peel the avocados and put them into a bowl.
To finish merging, we add guacamole.md to the changes
being made by the merge and then commit:
OUTPUT
On branch main
All conflicts fixed but you are still merging.
  (use "git commit" to conclude merge)

Changes to be committed:

	modified:   guacamole.md
OUTPUT
[main 2abf2b1] Merge changes from GitLabNow we can push our changes to GitLab:
OUTPUT
Enumerating objects: 10, done.
Counting objects: 100% (10/10), done.
Delta compression using up to 8 threads
Compressing objects: 100% (6/6), done.
Writing objects: 100% (6/6), 645 bytes | 645.00 KiB/s, done.
Total 6 (delta 4), reused 0 (delta 0)
remote: Resolving deltas: 100% (4/4), completed with 2 local objects.
To https://gitlab.tudelft.nl:alflin/recipes.git
   dabb4c8..2abf2b1  main -> main
Git keeps track of what we’ve merged with what, so we don’t have to fix things by hand again when the collaborator who made the first change pulls again:
OUTPUT
remote: Enumerating objects: 10, done.
remote: Counting objects: 100% (10/10), done.
remote: Compressing objects: 100% (2/2), done.
remote: Total 6 (delta 4), reused 6 (delta 4), pack-reused 0
Unpacking objects: 100% (6/6), done.
From https://gitlab.tudelft.nl:alflin/recipes.git
 * branch            main     -> FETCH_HEAD
    dabb4c8..2abf2b1  main     -> origin/main
Updating dabb4c8..2abf2b1
Fast-forward
 guacamole.md | 2 +-
 1 file changed, 1 insertion(+), 1 deletion(-)
We get the merged file:
OUTPUT
# Guacamole
## Ingredients
* avocado
* lime
* salt
## Instructions
* peel the avocados and put them into a bowl.
We don’t need to merge again because Git knows someone has already done that.
How to minimize the chance of conflicts
Git’s ability to resolve conflicts is very useful, but conflict resolution costs time and effort, and can introduce errors if conflicts are not resolved correctly. If you find yourself resolving a lot of conflicts in a project, consider these technical approaches to reducing them:
- Pull from upstream more frequently, especially before starting new work
- Use topic branches to segregate work, merging to main when complete
- Make smaller more atomic commits
- Push your work when it is done and encourage your team to do the same to reduce work in progress and, by extension, the chance of having conflicts
- Where logically appropriate, break large files into smaller ones so that it is less likely that two authors will alter the same file simultaneously
Conflicts can also be minimized with project management strategies:
- Clarify who is responsible for what areas with your collaborators
- Discuss what order tasks should be carried out in with your collaborators so that tasks expected to change the same lines won’t be worked on simultaneously
- If the conflicts are stylistic churn (e.g. tabs vs. spaces),
establish a project convention that is governing and use code style
tools (e.g.
htmltidy,perltidy,rubocop, etc.) to enforce, if necessary
Solving Conflicts that You Create
Clone the repository created by your instructor. Add a new file to it, and modify an existing file (your instructor will tell you which one). When asked by your instructor, pull her changes from the repository to create a conflict, then resolve it.
A Typical Work Session
You sit down at your computer to work on a shared project that is tracked in a remote Git repository. During your work session, you take the following actions, but not in this order:
-
Make changes by appending the number
100to a text filenumbers.txt - Update remote repository to match the local repository
- Celebrate your success with some fancy beverage(s)
- Update local repository to match the remote repository
- Stage changes to be committed
- Commit changes to the local repository
In what order should you perform these actions to minimize the chances of conflicts? Put the commands above in order in the action column of the table below. When you have the order right, see if you can write the corresponding commands in the command column. A few steps are populated to get you started.
| order | action . . . . . . . . . . | command . . . . . . . . . . |
|---|---|---|
| 1 | ||
| 2 | echo 100 >> numbers.txt |
|
| 3 | ||
| 4 | ||
| 5 | ||
| 6 | Celebrate! |
| order | action . . . . . . | command . . . . . . . . . . . . . . . . . . . |
|---|---|---|
| 1 | Update local | git pull origin main |
| 2 | Make changes | echo 100 >> numbers.txt |
| 3 | Stage changes | git add numbers.txt |
| 4 | Commit changes | git commit -m "Add 100 to numbers.txt" |
| 5 | Update remote | git push origin main |
| 6 | Celebrate! |
Git Branches
When we do git status, Git also tells us that we are
currently on the main branch of the project. A branch is
one version of your project (the files in your repository) that can
contain its own set of commits. We can create a new branch, make changes
to the code which we then commit to the branch, and, once we are happy
with those changes, merge them back to the main branch. To see what
other branches are available, do:
OUTPUT
* mainAt the moment, there is only one branch (main) and hence
only one version of the code available. When you create a Git repository
for the first time, by default you only get one version (i.e. branch) -
main. Let us have a look at why having different branches
might be useful.
Feature Branch Software Development Workflow
While it is technically OK to commit your changes directly to
main branch, and you may often find yourself doing so for
some minor changes, the best practice is to use a new branch for each
separate and self-contained unit/piece of work you want to add to the
project. This unit of work is also often called a feature and
the branch where you develop it is called a feature branch.
Each feature branch should have its own meaningful name - indicating its
purpose (e.g. “issue23-fix”). If we keep making changes and pushing them
directly to main branch on GitLab, then anyone who
downloads our software from there will get all of our work in progress -
whether or not it is ready to use! So, working on a separate branch for
each feature you are adding is good for several reasons:
- it enables the main branch to remain stable while you and the team explore and test the new code on a feature branch,
- it enables you to keep the untested and not-yet-functional feature branch code under version control and backed up,
- you and other team members may work on several features at the same time independently from one another, and
- if you decide that the feature is not working or is no longer needed - you can easily and safely discard that branch without affecting the rest of the code.
Branches are commonly used as part of a feature-branch workflow, shown in the diagram below.

Git feature branches
Adapted from
Git
Tutorial by sillevl (Creative Commons Attribution 4.0 International
License)
The feature branch workflow is mostly used for software development projects, and consists of the following:
- The
mainbranch - which corresponds to the version of the software currently in use. This main branch should only contain code that has been thoroughly tested, and is stable and reliable. - The
developmentbranch - which typically contains completed but not yet released code. This branch should only contain working code (thus - no half-finished features); however the code here has not yet been released, so it may be less tested and reliable compared to themainbranch. - A number of
featurebranches - corresponding to various new features being developed for the project. Code on these branches does not have to be complete, and is not even expected to always work. - Developers work on new functionality on these
featurebranches, by making changes and commiting them (the typical modify-add-commit flow). Once a feature is completed, it is tested on its feature branch, and once testing is successful, thefeaturebranch is merged to thedevelopmentbranch. - After even more testing on the development branch, this branch is
then merged to the
mainbranch, and from there the code is released to users or customers.
It is important to understand that the points when feature branches
are merged to develop, and develop to
main depend entirely on the practice/strategy established
in the team. For example, for smaller projects (e.g. if you are working
alone on a project or in a very small team), feature branches sometimes
get directly merged into main upon testing, skipping the
develop branch step. In other projects, the merge into
main happens only at the point of making a new software
release. Whichever is the case for you, a good rule of thumb is -
nothing that is broken should be in
main.
Creating Branches
Let us create a develop branch to work on:
This command does not give any output, but if we run
git branch again, without giving it a new branch name, we
can see the list of branches we have - including the new one we have
just made.
OUTPUT
    develop
  * main
The * indicates the currently active branch. So how do
we switch to our new branch? We use the git switch command
with the name of the branch:
OUTPUT
Switched to branch 'develop'‘git switch’ vs ‘git checkout’
The original way of switching branches in Git was using
git checkout <branch> — and you may still find such
examples online. However, git checkout had multiple roles
(was also used to restore versions of a file for example), making it
confusing. To simplify things, starting with version 2.23 Git
has introduced the git switch, command which is dedicated
for branch changes. Use git switch <branch> for
switching branches and git checkout -- <file> to
restore files.
Updating Branches
If we start updating and committing files now, the commits will
happen on the develop branch and will not affect the
version of the code in main. We add and commit things to
develop branch in the same way as we do to
main.
Let us make a small modification to guacamole.md and,
say, change “peel the avocados” to “Peel the avocados”
to see updating branches in action.
If we do:
OUTPUT
   On branch develop
   Changes not staged for commit:
     (use "git add <file>..." to update what will be committed)
     (use "git restore <file>..." to discard changes in working directory)

   	modified:   guacamole.md

   no changes added to commit (use "git add" and/or "git commit -a")
Git is telling us that we are on branch develop and
which tracked files have been modified in our working directory.
We can now add and commit the changes in
the usual way.
Currently Active Branch
Remember, add and commit commands always
act on the currently active branch. You have to be careful and aware of
which branch you are working with at any given moment.
git status can help with that, and you will find yourself
invoking it very often.
Pushing New Branch Remotely
We push the contents of the develop branch to GitLab in
the same way as we pushed the main branch. However, as we
have just created this branch locally, it still does not exist in our
remote repository. You can check that in GitLab by listing all
branches.
To push a new local branch remotely for the first time, you could use
the -u flag and the name of the branch you are creating and
pushing to:
Git Push With -u Flag
Using the -u switch with the git push
command is a handy shortcut for: (1) creating the new remote branch and
(2) setting your local branch to automatically track the remote one at
the same time. You need to use the -u switch only once to
set up that association between your branch and the remote one
explicitly. After that you could simply use git push
without specifying the remote repository, if you wished so. We still
prefer to explicitly state this information in commands.
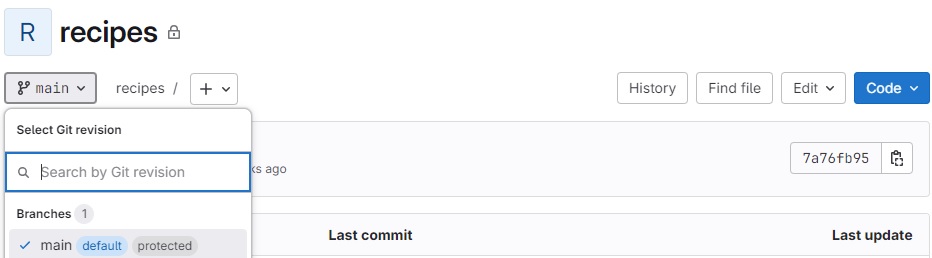
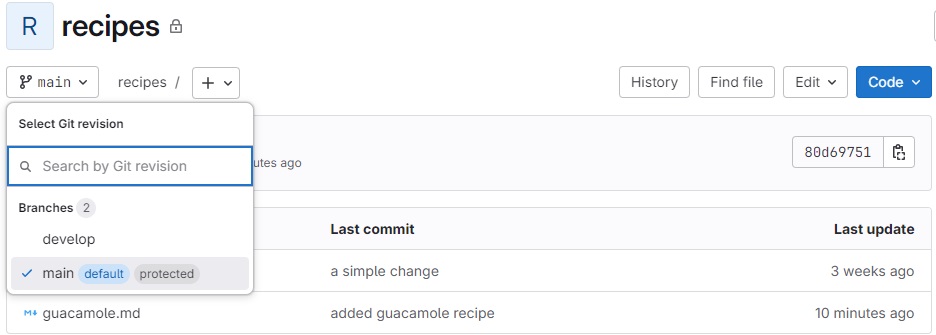
Let us confirm that the new branch develop now exist
remotely on GitLab too. From your repository main page in GitLab, click
the branch dropdown menu (currently showing the default branch
main). You should see your develop branch in
the list too.
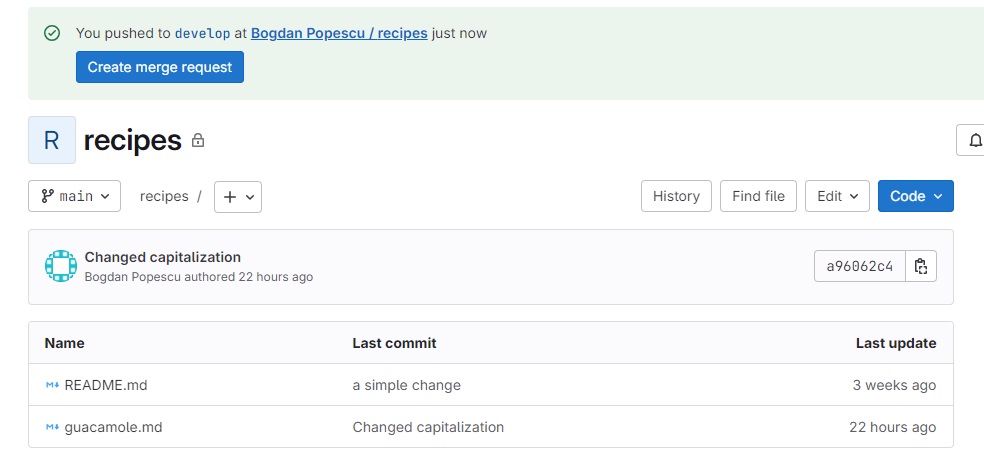
You may also have noticed GitLab’s notification about the latest push
to your develop branch just on top of the repository files
and branches drop-down menu.
Now the others can check out the develop branch too and
continue to develop code on it.
After the initial push of the new branch, each next time we push to
it in the usual manner (i.e. without the -u switch):
Merging Into Main Branch
Once you have tested your changes on the develop branch,
you will want to merge them onto the main branch. To do so,
make sure you have committed all your changes on the
develop branch and then switch to main:
OUTPUT
Switched to branch 'main'
Your branch is up to date with 'origin/main'.
To merge the develop branch on top of main
do:
OUTPUT
Updating 80d6975..a96062c
Fast-forward
 guacamole.md | 2 +-
 1 file changed, 1 insertion(+), 1 deletion(-)
If there are no conflicts, Git will merge the branches without
complaining and replay all commits from develop on top of
the last commit from main. If there are merge conflicts
(e.g. a team collaborator modified the same portion of the same file you
are working on and checked in their changes before you), the particular
files with conflicts will be marked and you will need to resolve those
conflicts and commit the changes before attempting to merge again. Since
we have no conflicts, we can now push the main branch to
the remote repository:
All Branches Are Equal
In Git, all branches are equal - there is nothing special about the
main branch. It is called that by convention and is created
by default, but it can also be called something else. A good example is
gh-pages branch which is often the source branch for
website projects hosted on GitHub (rather than main).
Keeping Main Branch Stable
Good software development practice is to keep the main
branch stable while you and the team develop and test new
functionalities on feature branches (which can be done in parallel and
independently by different team members). The next step is to merge
feature branches onto the develop branch, where more
testing can occur to verify that the new features work well with the
rest of the code (and not just in isolation). We talk more about
different types of code testing in one of the following episodes.
Merge Requests in GitLab
In addition to merging branches through the command line, it is also possible to perform a Merge Request in GitLab. To see how this works, switch back to the develop branch in the recipes repo, and modify the guacamole recipe - by adding one extra line for the ‘Instructions’: ‘Add salt’. Commit your changes, and push them to GitLab.
When you reload your GitLab repo main page, you should see that GitLab now gives you the option to create a ‘Merge Request’ to merge your changes in develop to main:
When clicking the “Create merge request” button, GitLab will open a new Merge Request form:
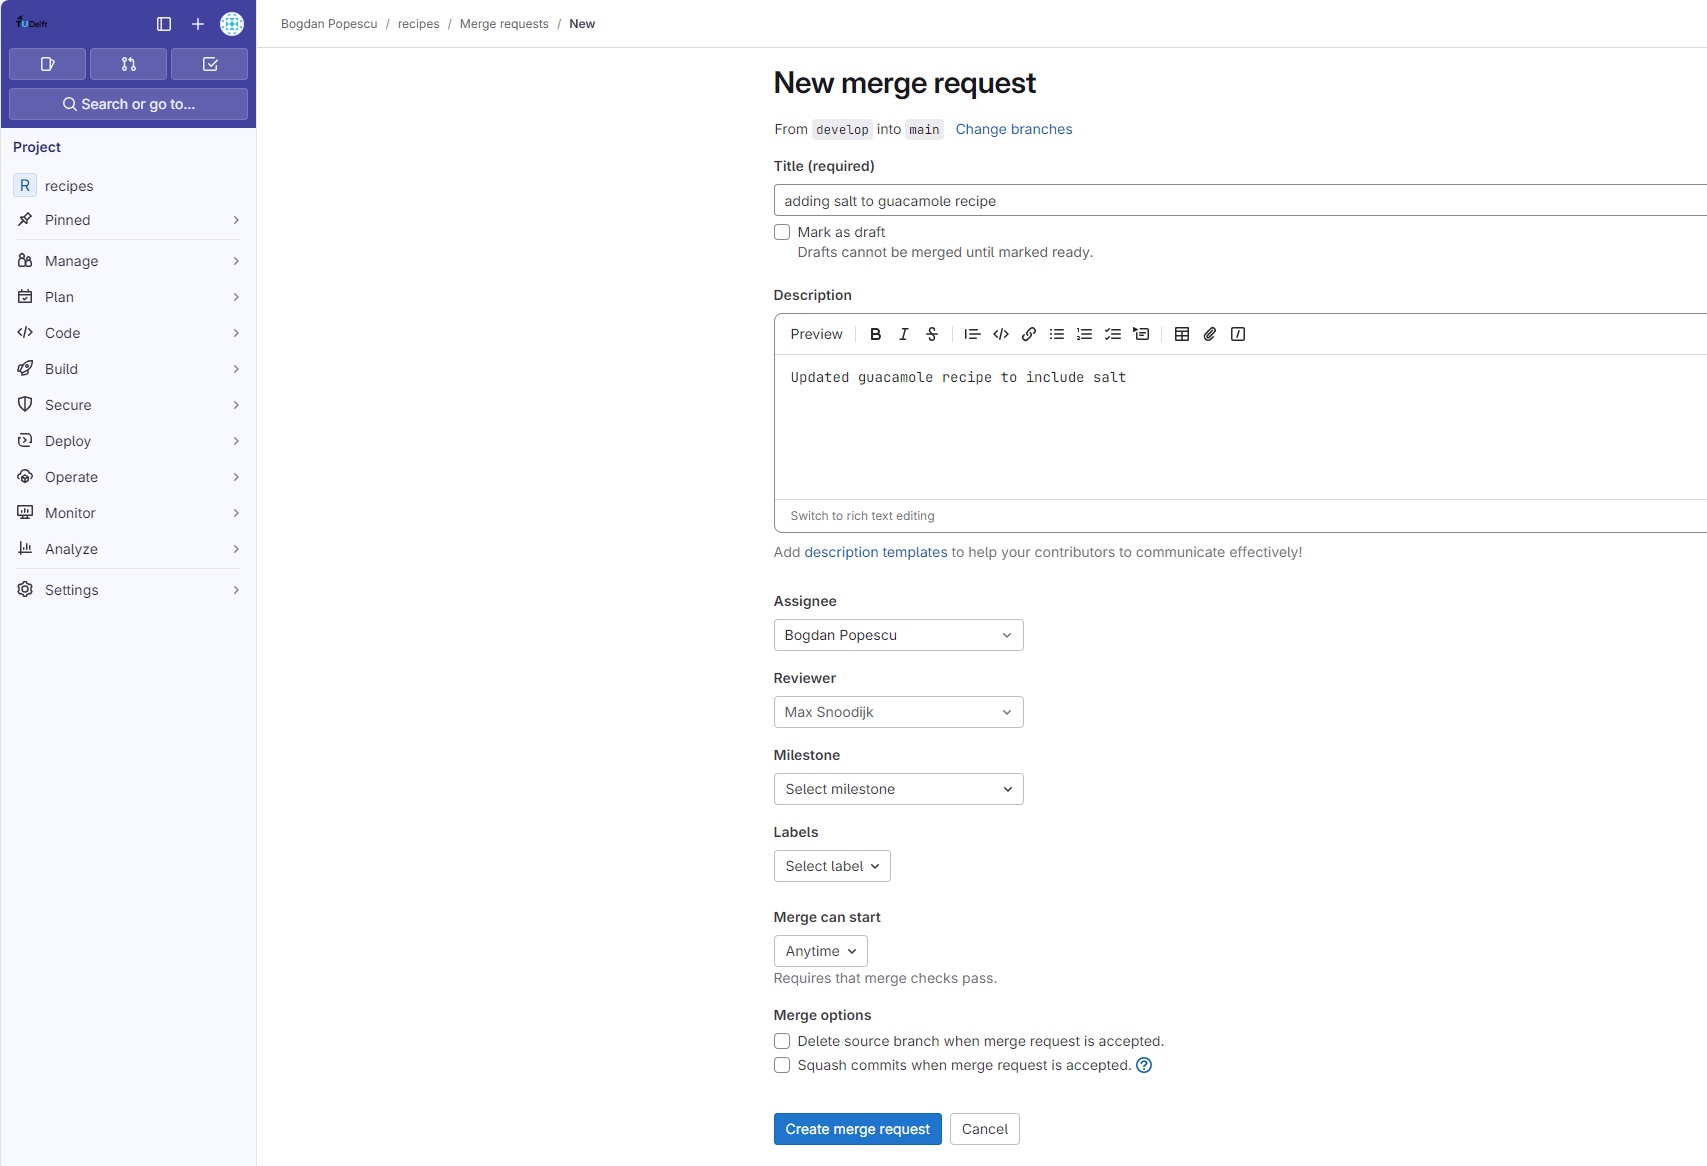
There you can fill details abut this merge, such as the Title and Description, as well as some process-related fields, such as the Asignee and Reviewer. It is good practice to always have a reviewer for any significant code changes. Many large software projects have strict governance rules requiring for example at least one reviewer approval before merging to the main branch, and it is even possible to even configure GitLab to enforce such policies. For now, we advise you to setup informal review rules with your colleagues when working on a joint project.
Once a merge request has been created, GitLab provides process controls for managing its lifecycle:
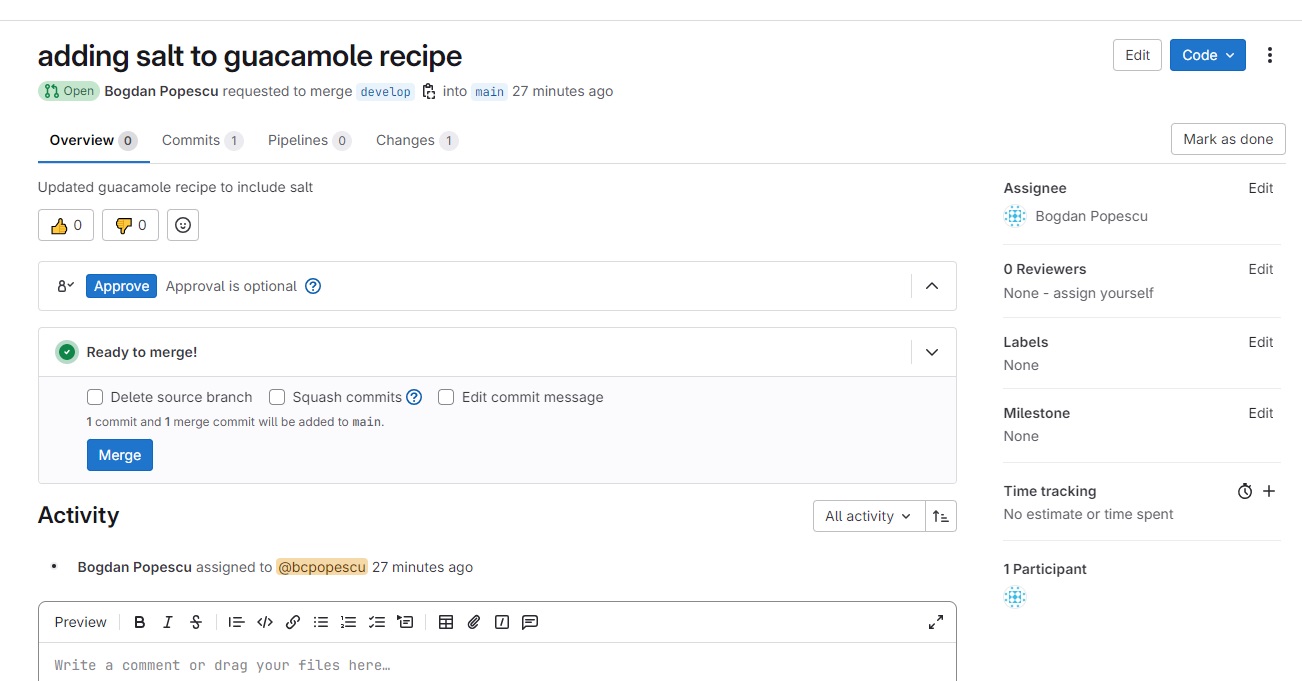
This form can be accessed from the “Merge requests” menu on the left tab. On this form you can perform actions such as: - approve the merge request by clicking the “Approve” button. - do the actual (Git) merge by clicking the “Merge” button. - review the commits part of this merge request in the “Commits” tab - review the code changes part of this merge request in the “Changes” tab - comment on code changes, also from the “Changes” tab. When making a comment, GitLab notifies the asignee for the merge request about the comment via email.
Branch - Merge Request Cycle with Conflicts
For this challenge, again work in Owner - Collaborator pairs
- As the Collaborator - create a new feature branch -
feature_all_caps - On this branch - change the spelling of all guacamole ingredients to all caps!
- Create a merge request in GitLab - requesting to merge your new
branch to
develop - After that, as the Owner change the guacamole recipe on the
developbranch:- all ingredients are capitalize (only the first letter!)
- commit and push your changes
- As the Collaborator - check the status of your merge request on GitLab. Is merging still possible?
- Together fix the
feature_all_capsbranch so merging to develop IS possible - Complete the merge request!
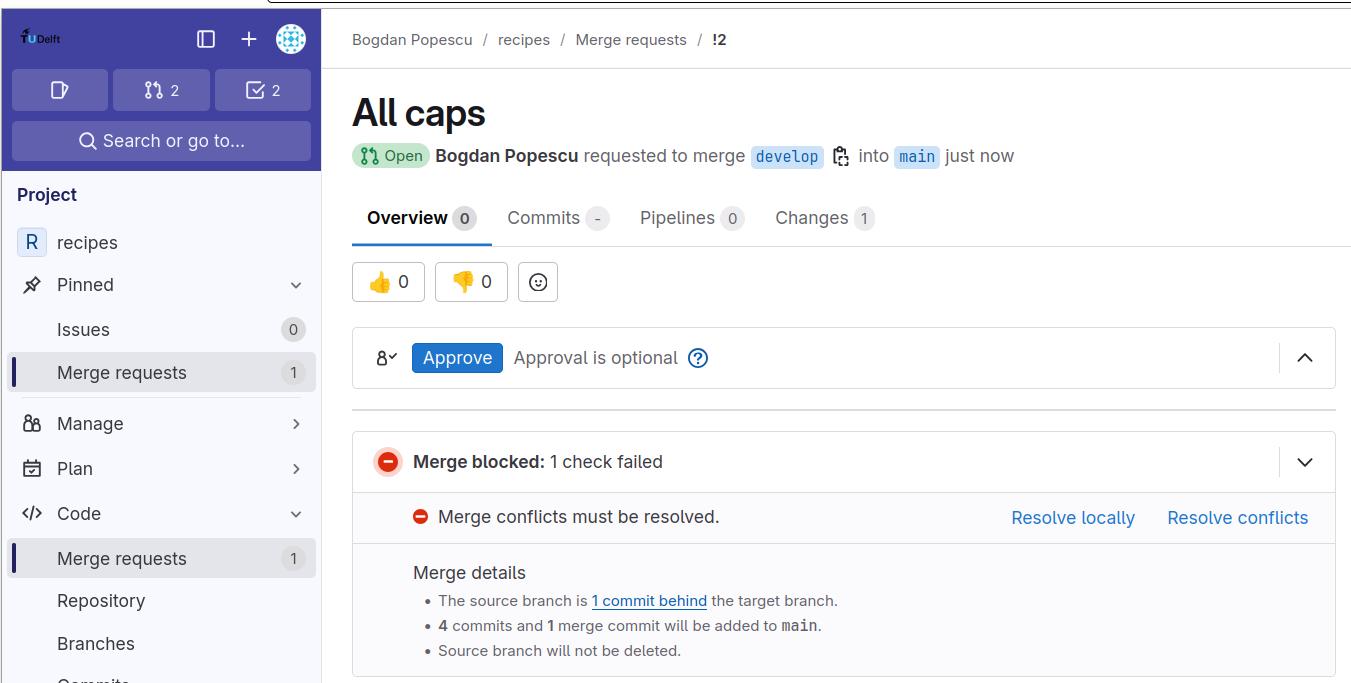
After the Owner has made changes to the develop branch
completing the merge request in GitLab is no longer possible - as GitLab
notices there is a conflict between develop and the
feature_all_caps branches:
The trick to solving these conflicts is to manually merge the
develop branch into the feature_all_caps
branch:
Once you have done that, git will indicate there are merge conflicts - which you can solve the same way you did earlier - for example using the PyCharm git interface.
Once conflicts have been solved, commit them (on the
feature_all_caps branch) and push everything to GitLab.
Now, if you refresh the Merge Request page on GitLab you should see that merging is possible!
-
git clonecopies a remote repository to create a local repository with a remote calledoriginautomatically set up. - Conflicts occur when two or more people change the same lines of the same file.
- The version control system does not allow people to overwrite each other’s changes blindly, but highlights conflicts so that they can be resolved.
- A branch is one version of your project that can contain its own set of commits.
- Feature branches enable us to develop / explore / test new code
features without affecting the stable
maincode. - GitLab merge requests provide a structured process approach to Git branch merging
Comment Changes in GitLab
The Collaborator has some questions about one line change made by the Owner and has some suggestions to propose.
With GitLab, it is possible to comment on a commit. Over the line of code to comment, a blue comment icon appears to open a comment window. In that window, the Collaborator can post their comments. When a comment is posted, GitLab will inform the author of the commit about it by email, and then the author can address the comment using the same GitLab web interface.